Overview
This article describes how to configure Heartland Retail to use the PAX Aries8 device to process payments. The PAX Aries8 is supported only by Heartland Payment processing.
To function properly, the PAX Aries8 must be loaded with a Special PAXStore template for Heartland Retail.
We recommend you make any adjustments to the device at the PAXStore level to ensure that, if the device’s firmware is ever updated or changed, those updates will include the site-specific settings. If you do not set them at the PAXStore level, your settings will be overwritten by any downloads.
Prerequisites
- You must add an Aries8 SKU to an opportunity in Salesforce.
- The merchant account must have a Heartland Processing MID in Salesforce to complete the order.
- The merchant must be processing with Heartland Payments Systems.
- Device must be running BroadPOS V1.01.13E.
PAX devices are set up in BroadPOS or PAXStore with a pre-configured template for Heartland Retail. We recommend you make any adjustments to the device at the BroadPOS/PAXStore level to ensure that, if the device’s firmware is ever updated or changed, those updates will include the site-specific settings. If you do not set them at this level, your settings will be overwritten by any downloads.
If you have any questions or concerns regarding the PAX device, please email them to paxsupport@e-hps.com, or call 1.888.909.8498.
Connecting the Aries8 to WiFi Network
- Power on the PAX device.
- Connect the PAX device to WiFi network via Settings (WLAN=WiFi). Please note that a password is required.
- Note the IP address, displayed under the BroadPOS logo when the device boots up.
- In Portico, set the following Configuration Settings:
- Host Settings
- DeviceID
- Username
- ECR Comm Settings
- Ethernet = ‘Enabled’
- Protocol Type = ‘HTTP GET’
- Host Settings
- Launch Heartland Retail to ensure that the PAX Aries8 device IP address is initialized and synced.
- Navigate to the Dashboard of Heartland Retail, then go to Settings > Reload Devices > Payment Device.
NOTE: Heartland Retail and the PAX Aries8 must be on the SAME Wifi network.
Configuring Heartland Retail
Make sure your device is plugged in to a power source and is connected to your store's network.
Activate Heartland Gateway
In order to start processing transactions with Heartland, you need to activate it in your account.
- Log in to your Heartland Retail account and go to Settings > Credit Cards > Location, selecting the location in which you are using your new device.
- Click the Add Gateway button.

- Click the Choose link under the Heartland logo.

- Next, fill in the information required on the form. This should have already been filled in by the dealer/reseller already, but can be acquired for the device via broadPOS or the PAXStore.

Service URL: http://api2.heartlandportico.com
Sync your Device
- In the Point of Sale left menu, click the Settings option as shown below.

- In the Settings popup, select PAX Payment Terminal from the Payment Devices The device should have a pre-configured IP address.

Congratulations! You are now ready to process credit cards with Heartland and your new payment device.
Other Features
Payment Signature Capture
- When connected with PAX Aries8 devices via Heartland processing, signature-capture will be enabled by default. If you do not wish to use this feature, go to the Settings -> Location -> Station page at each station to disable the setting.
- Once you capture the signature on the PAX device, it will be stored with the transaction and will display it in the following areas:
- Under the payments section when viewing a completed Sales Ticket
- Under the payments section on a Sales Order
Customer Facing Display
The PAX Aries8 can be used as a customer-facing display. In order to access this functionality, you must enable the Customer-Facing Display setting on the device.
Once you have configured the device, configure in Heartland Retail as described:
- Go to the Point of Sale screen and select the menu icon (displayed as ≡) located in the upper left corner.


- Go to Settings to open the connect app.

- The Customer Display Device dropdown will automatically display a list of all connected devices that support this feature.
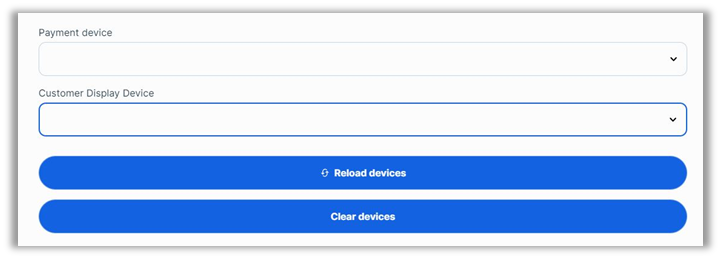
- Select your device from the list to enable Customer Display.